


I have had so many requests for the Kinderpack version of my hoodie hood pattern and tutorial.
So now, I present to you the Kinderpack Hoodie Hood Tutorial!!
I love that the Koolnit hood is breathable, but my kid HATES flat hoods on all carriers! He will scream bloody murder when it's up if he happens to be awake. That flat hood also does little to nothing to help protect my kid's head from the sun or other elements.
If you're in the same boat as me or you just love that you can personalize your carriers with fun designs like the one pictured above, it's time to make a hoodie hood!
This pattern will fit a Kinderpack in a standard size. It may be adjusted or adapted to use with other sizes; however instructions for this are not provided in this tutorial. If you've made this hoodie in other sizes, feel free to leave your notes in the comments for others to enjoy!
This pattern is reversible, but keep in mind that you will need to apply two sets of snaps to change the direction. Also, hoods with embellishments on the outside may not be comfortable to use when reversed.
Here's your supply list:
• two coordinating fabrics (a fat quarter of each may just barely fit, but 1/2 yard is a safe bet)
• pronged studs for plastic snaps and setting tools
• coordinating thread
• nylon webbing (about a yard of 3/4" nylon or polypropylene)
• 3/4" stealth duraflex plastic buckles (find them here)
Now you will need to print the pattern found here. Match up the words from the two pages and tape the two halves of the pattern together before cutting out the completed pattern. I like to use a window to help me line everything up. You’re ready to start!

First, you will need to cut out your pattern pieces. Make sure that your fabric is folded in half
such that the pattern is parallel to the fold.

If the pattern in your fabric is not positioned this way off the bolt, you will want to make sure that you unfold and fold in the opposite direction. If you don't do this, the fabric design will be sideways on your hood!

Place the pattern against the fold on the indicated locations. Cut around the edges of the
pattern EXCEPT where it is marked as FOLD LINE.

Do this for both of your pieces of fabric. You will be left with two pieces in this shape.

Fold right sides together of each piece and sew along the top curve using a 1/4" seam allowance.


Press the seams open along the curve.

NOTE: If you are planning to embellish the front of the hood in any way, you will want to do that now. Be sure to leave a small gap at the bottom to allow for sewing the outside and inside of the hood together.
Turn both pieces and nest the top and bottom fabrics of the hood together so that right sides are together. Pin in place, matching the seam line at the top, center of the hood.


Cut two pieces of webbing about 15 inches long.

I like to use a lighter or candle to slightly melt the ends of the webbing to prevent any fraying. Below you can see the piece on the left before melting and the piece on the right after melting.

Locate the small mark on the pattern for the webbing and insert the webbing between the two layers of the hood at the marked location. Leave at least a quarter of an inch of the webbing sticking out. Pin in place. (If you have a hard time putting a pin through the webbing, try placing pins on the fabric very closely on either side of the webbing to hold it in place or use wonder clips as shown here.)


Sew all the way around the outside edge of the hood. Make sure to sew back and forth over the webbing several times to keep it secure during use. I like to use a zig-zag stitch in the seam allowance.

Turn the hood right sides out.

Press the seamed edge.

Top-stitch around the sides and top of the two pieces.

Cut a piece of material 4 inches tall by 10 inches wide for the binding of the base.
NOTE: This can be shortened or lengthened based on your preference. I like mine a little wider than the headrest of my Kinderpack so that it stays tucked in during use.

Press the sides in a half of an inch. Fold in half lengthwise and press again. Now fold each of the long raw edges in a half of an inch and press one more time.

You'll be left with a strip that is about 1.5 inches tall with no unfinished edges showing.

Mark the location on your hood for the pleat. This is found at the bottom of the pattern. Make sure to mark both sides of the hood. I use pins for this.
NOTE: If you have adjusted the width of the binding, you will need to adjust this placement in or out as well. Your finished width after pleating should match the same width of your finished binding piece.

Also, find the center of your hood at the bottom open edge and mark with a pin.

Do the same with your binding. Mark the center on the front and back.


Fold the pleats into the center of the hood at the marked locations. Pin these in place.


Line up the center of the hood to the center of the binding.

Pin across the bottom of the hood.


Sew up the side of the binding, across the bottom of the hood and then down the other side of the binding.


Now you will need to thread your buckles onto your webbing. Make sure to orient your buckles in the direction that you want your hood to face.


Fold over the end of the webbing and then fold it over one more time. Then sew across the edge to keep it secure. This will prevent the buckle from coming off.


Now you're ready for snaps! You will need two pronged studs and two female ends. You will also need a pronged stud adapter for your snap pliers or press.

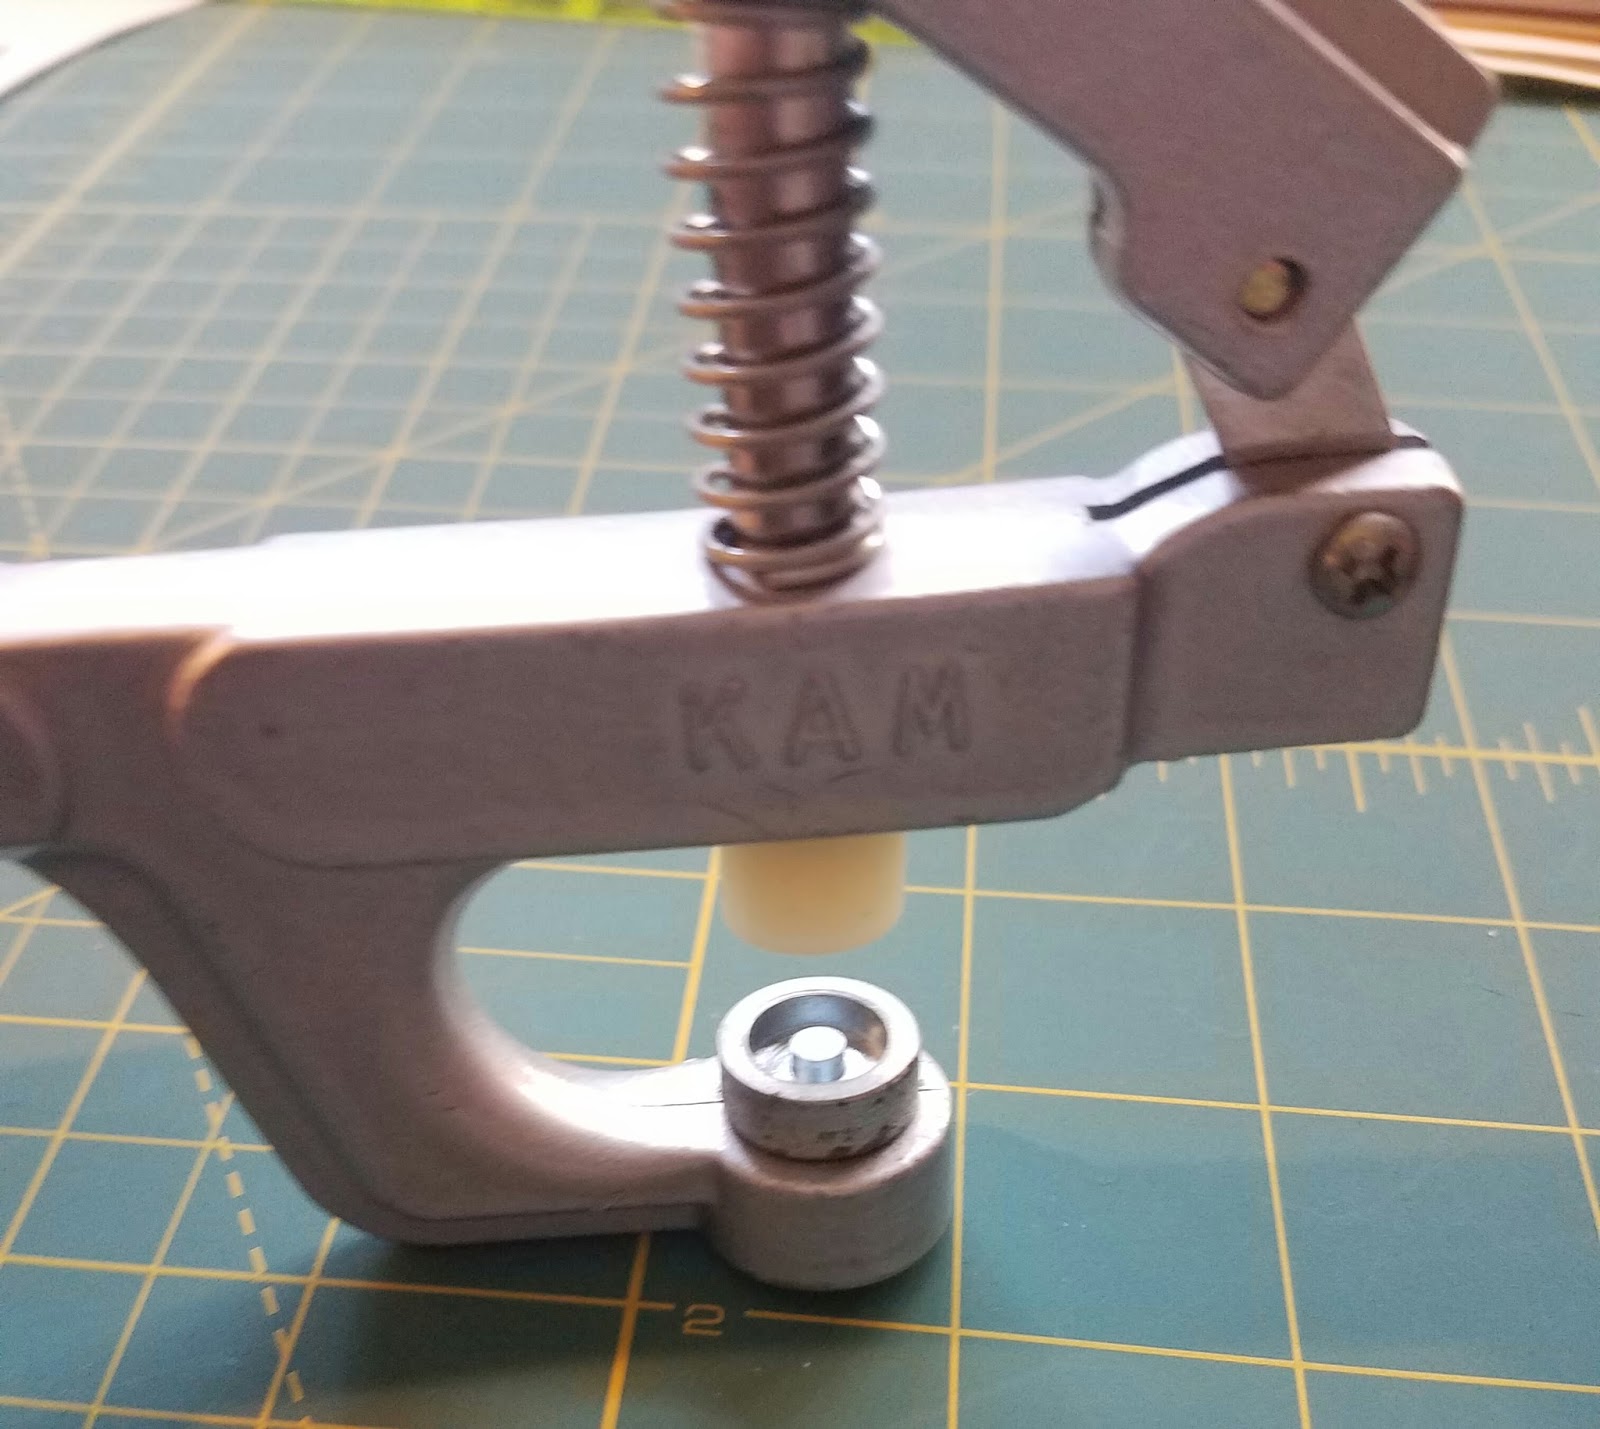
Snap should be approximately 2.5 inches apart. It’s always a good idea to measure your own Kinderpack to make sure that this measurement is correct. There may be variations in this distance due to manufacturing differences since each of these carriers are handmade. I’ve seen variations of around a quarter to a half inch.

Measure half of the snap width from the center, just above the binding, and mark with a pin or disappearing/washable fabric marker. Or you can use your Kinderpack to press into the material to make the perfect marks for your carrier. I just place my hood in the place I want it to be and press the snaps together as hard as I can. This leave circular marks where I need the snaps to be placed.


Measure your marks again to make sure that they are the right distance apart and adjust if necessary. It's important to get the distance apart right so that the hood will snap into your carrier correctly. When in doubt, err on the side of too far apart instead of too close together. Use an awl to make a small hole for the stud to go through.

Follow the directions of your preferred snap setting device to install the snaps. You can use snap pliers or snap presses to install the snaps. Place the stud side of the snaps to the back of the hood and the female side to the front of the hood. Repeat for the other mark.


You're done! Snap it into your Kinderpack and you’re ready to go!


As always, if you enjoyed this tutorial, please consider purchasing the printable version on Etsy or donating to help me write more! Thank you to those who have already made donations. A small donation will go a long way!
How to unlock a phone from carrier
ReplyDeleteWatch Miami Dolphins Live
ReplyDeleteWatch Browns Game live Stream
Dolphins Game Live Stream
Browns Football live Online
The Green Bay Packers are Packers Game Today a professional NFL team based in the Green Bay Bay Area. You can watch Green Bay Packers game live streaming online. Get the latest Green Bay Packers schedule, TV channel, news update here.
ReplyDeletePackers Football Live
Watch Packers Game Live
That looks great! I have a black hoodie I feel is so dull...I believ it will have a similar makeoverf.
ReplyDeletebig drip hoodie
men's camo bomber jacket